'Contact form 7' is one the most popular 'contact form' plugins for wordpress; and for good reasons too.
Here are some of the reasons why this plugin is so good:
- All functionalities of the plugin are completely free.
- Super easy to configure.
- Uses ajax which means the page won't be refreshed each time the visitor clicks 'send' or makes an error.
- Uses short-codes which can be placed on any page/post where you want a contact form.
- Users can create simple as well as complex forms with check boxes, drop downs and quizzes.
- Allows for each integration of Google's Recaptcha for effective spam blocking. (Is also compatible with askimet).
- Is clean and light weight.
- Is constantly updated and maintained by the author - Takayuki Miyoshi.
Now let's see how you can install contact form 7 in your wordpress blog:
Table of Contents
Steps to install Contact form 7
Follow these steps to install and activate the plugin:
Step 1: Login to your wordpress dashboard and click on 'Plugins > Add New' from the left panel. (Hover your cursor on Plugins link and click on Add New from the pop-out menu.)

Or click on Plugins and and then click the 'Add New' button located at the top right of the plugins page.
Step 2: Search for 'Contact form 7' in the search box. From the search results, make sure that the author of the plugin is 'Takayuki Miyoshi'.

Step 3: Click the 'Install Now' button and once installed click 'Activate'. Or you can also activate the plugin by going to Plugins > Installed Plugins and then clicking the 'Activate' link under your plugin.
That's it. Now you have installed and activated the plugin.
'Contact form 7' settings page
Now that the plugin is activated, you will be able to see a new link added to the left sidebar of your wordpress dashboard named 'Contact'. Click on this 'Contact' link to reach the settings page.

You can also reach the settings page by going to Plugins > Installed Plugins. Once here, locate the 'contact form 7' plugin and click on the 'Settings' link.
Creating your first contact form
On the settings page, you will see a default contact form named 'Contact form 1'. You can edit this contact form, or add a brand new contact form by clicking on the 'Add New' button located on the top right.
Hover your cursor on the default contact form (Contact form 1) and click 'Edit' to be taken to the 'Edit Contact Form' page.
One the 'Edit Contact Form' page, first, change the heading of the contact form from 'Contact form 1' to something more meaningful so you can identify it easily (Example: Main Contact Form). This is especially important if you plan on creating many different contact forms.
You will be able to see four tabs namely Form, Mail, Messages and Additional Settings. Let's see what they are and how you can edit them.
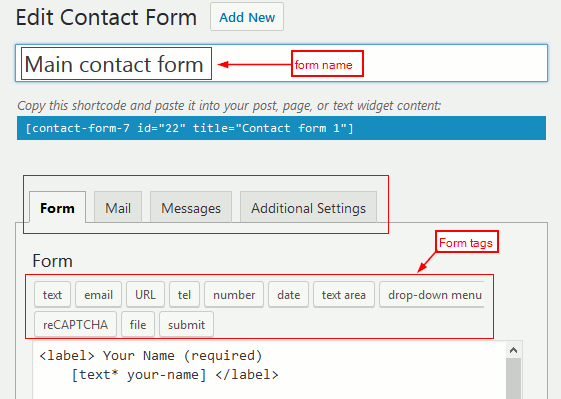
1.) Form tab
The form tab allows you to add/remove form fields. The default form fields are as follows:
- Name
- Email Address
- Subject
- Mail Content
- Submit button
You can add new fields or remove fields that you do not want.
For example, if you do not want the 'subject' form field, you can remove the code as shown in the image below:

You can also add additional form fields (using tags) to collect more information from your users.
Contact form 7 allows you to add the following types of tags:
- URL: Get the user's website address.
- Phone: Get user's phone number.
- Drop down menus: Allow user to select from a drop down menu.
- Check boxes and Radio buttons: Allow user to check an option. For example, What is your gender - male, female?
- Acceptance: Make the user agree to terms and conditions before contacting you.
- File attachments: Allow the user to attach a file.
- Recaptcha: You can add Google's recaptcha verification to block spam bots sending you automated emails.
Let's see how to add a website URL field to your contact form:
To do this, click on the area where you want the website URL field to appear in the form.
For example, if you want the field to appear after the email field, but before the message field, click in the area between them.
Now, click the URL tag from the form tags (refer image below), change the name to something meaningful like 'your-URL' and click the insert tag button.
You should see the following inserted into your form:
[url your-URL]
Now you need to enter some text that you want displayed before the URL form field. For example, 'Please enter your website URL'.
To do this, simply add the text and support the whole thing in label tags as follows:
<label>Your website URL
[url your-URL]</label>
Refer image below:

In a similar fashion you can add a phone number field to your form by inserting the 'tel tag'.
Now let's see how to add a checkbox to your contact form:
Let's say you want to add check-boxes to find out what the gender of the user is.
To do this, click on the 'checkboxes' tag and change the name to something meaningful, eg: your-gender.
Click on 'make check-boxes exclusive' (This way the user can select only one checkbox). Click 'wrap each item with label element'. Now click the 'insert tag'.

Your checkbox field should look as follows:
[checkbox your-gender use_label_element exclusive "male" "female"]
If you do not want to use a checkbox, you can do the same using a radio button.
Finally, you can also add a terms and conditions checkbox that the user has to agree to. To do do this, click and insert the 'acceptance' tag. You can also add some text like 'I agree to terms and conditions'.
Here is an image of how the form looks after adding the URL, checkbox and acceptance tag:

As you can see from the image above, the form field also contains a reCaptcha tag. Contact form 7 allows you to add reCaptcha verification to your form. We will see how to do this later in this article.
Here's how the contact form will look like (with the additional fields we added):

2.) Mail tab
The Mail tab allows you to configure what user data you want included when a form is submitted. Let's see how to configure this:
1.) To Address: The To address is where the emails will be sent. In other words, if someone contacts you through your contact form, the email will be sent here.
By default, this is your wordpress admin email address. You can change this to an email that you generally check.
2.) Message Body: By default, the message body contains only the 'from email', 'subject' and 'your message' mail tags.
If you have added any additional form fields (like URL, phone, checkboxes etc.), you will need to include those fields (mail tags) in the email. Only then will you be able to get the data related to that field.
For example, if you included a website URL field, you will need to include the respective tag in the message body. Let's see how.
The Mail tab will display the default tags and the additional tags that you added. In our case, we adding the URL tag and the checkboxes tag.
You can include these additional tags in the mail, by copying and pasting the tags.
So your message body should look something like this:
From: [your-name] <[your-email]>
Subject: [your-subject]

Message Body:
[your-message]

Website URL: [your-url]
Gender: [your-gender]
Now, when you get the mail, all these fields will be included in the mail. If not, these fields will not be included.
Here is an image for further reference:

3.) Messages tab
This tab allows you to set all the canned messages. These are the messages that will be displayed when someone sends you an email, or if the user commits an error while filling out the fields (eg: leaving out a required field).
4.) Advanced settings tab
You need not make any changes here.
Adding the contact form to your blog
You can add the contact form that you created above, to any page of your blog by copying the respective short-code.

Copy the shortcode that you see on top of the mail generation form and paste it anywhere you want the form to appear.
After pasting, check if the contact form appears.
Send yourself a test email to see if everything is working fine.
If you do not see the email in your inbox, check your spam folder. If the email is there in the spam folder, make sure to white-list it so the next time it ends up in your inbox.
If you are using Gmail, you can white-list your mail by clicking on the 'Not spam' button. This way, next time the mail will arrive in your inbox.
Note: You can edit your contact form and add/remove fields at any time. This will automatically make changes to the contact form.
Adding Recaptcha to your contact form
Google's Recaptcha allows you to block spam bots from sending you unsolicited automated emails.
To use this feature, you will first need to create an account with Recaptcha.
Here are the steps to do this:
1.) Login to your gmail account.
2.) Visit Google's Recaptcha page here: https://www.google.com/recaptcha/admin
3.) Enter a label for your site, select reCaptcha V2 (or invisible reCaptcha), enter your domain name, accept terms and click on 'Register'.
4.) You should now be taken to a page that shows you two different keys - site keys and secret keys.
5.) Go back to your wordpress dashboard, click on Contact > Integration and copy paste the site and secret keys in their respective boxes.

6.) Go back to Contact > Contact Forms and Edit the form where you want to add the reCaptcha. Simply click on the reCaptcha tag and then click on 'insert tag'.
Now a captcha should appear in your contact form. Test it out to see if it is working properly.
Dealing with form not working error
Your will get the following error if the contact form is not able to send mails properly:
"There was an error trying to send your message. Please try again later."
In 90% of the cases, the error results because of SMTP issues. The best way to resolve this issue is to add the 'Easy WP SMTP' plugin.
Here are the steps:
Step 1: So go to Plugins > Add New, and search for 'Easy WP SMTP'. Install and activate the plugin.
Step 2: Once done, go to Settings > Easy WP SMTP to reach the settings page.
You can also reach the settings page by going to Plugins > Installed Plugins and then clicking on settings link beneath the Easy WP SMTP plugin.
Step 3: To get these SMTP (Outgoing Mail Server settings) settings, you will need to login to your Cpanel (or your web hosting panel).
Step 4: Once logged into Cpanel, click on 'Email Accounts' under the 'Email' section.
Step 5: If you do not have an email account created, then create an email account.
Step 6: Once an email account is created, scroll down until you find your email address (that you just created) listed and click on the 'Set up mail client' link.
Step 7: Scroll down until you find the, Secure SSL/TLS Settings. Make a note of the outgoing server and the SMTP port.
Step 8: Now go back to Settings > Easy WP SMTP and enter the following values:
- From Email Address: Enter the email address you just created in Cpanel.
- From Name: Any identifiable name. Eg: Your site name.
- SMTP host: Enter details of your outgoing server that you noted earlier. eg: mail.sitename.com or evada.websitewelcome.com if you are on hostgator.
- Type of encryption: Select SSL
- SMTP Port: Write down the value you noted earlier.
- SMTP Authentication: Select Yes.
- SMTP Username: Enter your email address again. (The one you created in cpanel)
- SMTP Password: Enter password for your email account.
Click on save changes.
You should now be able to send mails without getting any errors.
If you are still having issues, check out CollectiveRay's how to fix contact form 7 there was an error trying to send your message. please try again later.
Optimizing 'Contact form 7'
The 'contact form 7' plugin tends to add its Javascript and CSS references on all pages and posts in your wordpress blog. This means, even if a contact form is not present on the page/post, the JS and CSS references will still be loaded.
Although this is not a big deal and can be left as it is. But it is a good practice to remove these references and load them only when required. In other words, load them only on pages that have a contact page.
Here's an article I wrote on how you can achieve this:
https://orbitingweb.com/blog/prevent-cf7-from-loading-css-js/
If you have any additional queries, feel free to leave a comment and I will respond.
Thanks for the article! There is a plugin to improve Contact Form 7 default styles and loader:
https://wordpress.org/plugins/cf7-better-ui