This article is a continuation of: Steps to Use Amazon S3 and Cloudfront to Host Your WordPress Images.
If you are using Amazon Cloudfront to serve your website images, then you would have noticed that CloudFront has an option to use Custom URLs.
By default, images served from Cloudfront will have the Cloudfront URL as follows:
https://d2wd45d.cloudfront.net/wp‑content/uploads/20170725172338/photo.jpg
But, you have the option to serve images using your Custom URL, that has your domain name, for example:
https://images.example.com/wp‑content/uploads/20170725172338/photo.jpg
You can easily achieve this using the following steps:
1.) Activate a free Amazon SSL Certificate for your Sub Domains
The first step is to request and activate a free SSL certificate from Amazon for your 'sub domain' which will be used in the custom URL. In this example, we will be using 'images.example.com' as the sub domain.
If you already have a SSL certificate, you can import the certificate, but I think creating a new certificate is an easier option. Plus, Amazon offers free SSL certificates if you use Cloudfront.
So here's how you can request your free certificate:
Step 1: Login to your Cpanel and create an email ID: webmaster@example.com, if it is not already present. This is because, Amazon will send a verification email to the 'webmaster' email while requesting a certificate.
Step 2: Login to your AWS Management Console and click on the 'Services' link and then click on 'Certificate Manager' under 'Security, Identity and Compliance'.
Step 3: Click on the 'Request a Certificate' button.
In the domain name section, add your site name (example.com) and then click 'Add another name to this certificate' button and add your sub domains using a wild card (*.example.com) as shown in the image below:

Make sure to replace, example.com with your domain name.
Note: If you want, you can directly enter the sub domain that you wish to have the certificate for (images.example.com) instead of using the wild card. Either way is fine.
Once done, click on 'Review and request' button.
Step 4: Amazon will now send an email to webmaster@example.com and a few other related email IDs. Remember that we created the webmaster@example.com mail before. Check this mail and click on the link to confirm that you are the owner of the site.
Step 5: Click the 'I Approve' button. You will get a 'Success' message indicating that your certificate has been successfully setup.
Now, your certificate has been set-up.
You can view this certificate by going to 'Services > Certificate Manager'.
2.) Add a CNAME with Cloudfront and choose SSL Certificate for your distribution
The second step is to add a CNAME with Cloudfront and add the SSL certificate that you just created.
Step 1: Go to Services > Cloudfront. You should be able to see your cloudfront distributions here.
Step 2: Copy your Cloudfront domain name. We need to enter this in Cpanel Zone editor.
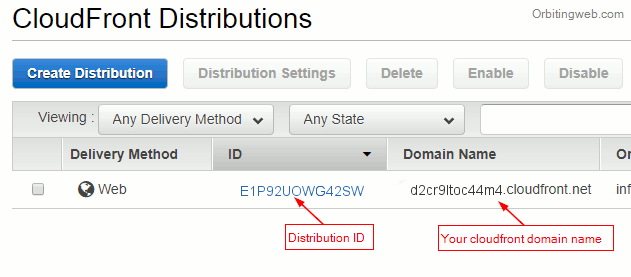
Step 3: Click on the ID of the distribution you want the custom domain name for (refer image above). This will take you to the General Tab. Click Edit from the General Tab and you will be taken to the 'Distribution Settings' page.
Step 4: In the 'Alternate Domain Names (CNAMEs)' section, add a sub domain name that will be used in your Image URLs. This has to be a sub-domain of your main domain. For example, images.example.com or img.example.com. You can choose any random sub domain that you want.
Step 5: After that, check the 'Custom SSL Certificate' checkbox and select the certificate that you created from the drop down.

If you don't see your certificate, simply logout of AWS and login.
Finally click the 'Yes Edit' button.
3.) Add a CNAME in CPanel
The third step is to add a CNAME record in Cpanel. Here's how:
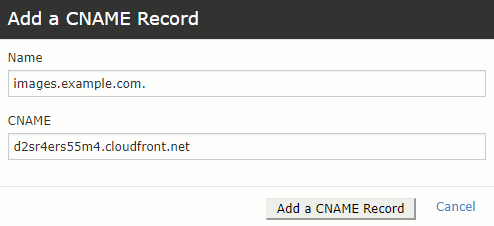
Step 1: Login to your Cpanel and click on 'Zone Editor'.
Step 2: Click on 'CNAME Record'. In the Name section, enter the URL of your sub-domain and in the CNAME section enter the URL of your Cloudfront domain (as copied in 'Step 2' above) and click the 'Add a CNAME Record' button.
Note: Remember that you need not create a sub-domain in Cpanel. Any random sub domain should do. If a sub domain with that name already exists, you will need to delete the A records before adding the CNAME. If not, you will get an error stating that an A Record already exists. Therefore, choose a domain name that does not already exist.
Examples of sub domains you can use:
images.example.com
img.example.com
myimages.example.com
i.example.com
4.) Add your custom domain name to S3 Lite Plugin
The final step is to add your sub domain to S3 Lite plugin.
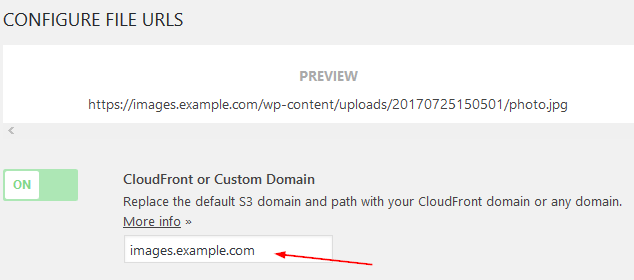
Step 1: Login to your WordPress admin panel and go to 'AWS > S3 and Cloudfront'.
Step 2: Enter your sub domain in the 'CloudFront or Custom Domain' input box and click the 'Save Changes' button.
That's about it. Your images will now be served using your custom URL.
Excellent tutorial. I followed the steps to setup a W3 Total Cache to serve from CloudFront. Thanks.
This article is missing something. We can not create a certificate until we add a CAA record in DNS to specify that AWS Certificate Manager (ACM) is allowed to issue a certificate for your domain or subdomain.