Wondering what Schema.org is? Or how you can use it to add structured data to your website?
Here's a beginner's guide that will help you understand all the nuances of using Schema.org.
- What is Schema.org?
- What is Microdata?
- Marking Up Webpages Using Schema.Org And Microdata
- Example 1: Marking Up the Header of a Website
- Example 2: Marking Up Content Section of a Website
- Example 3: Using Embedded Scopes for More Detailed Markup
- Marking Up Your WordPress Blog Using Schema.Org And Microdata
- Validating Your Schema.Org And Microdata Markup
1.) What is Schema.org?
Simply put, Schema.org is a vocabulary. You can use this vocabulary in conjunction with a HTML specification like Microdata to mark-up different sections of your website.
This data can then be read by search engines like Google to better understand and interpret your website.
Search engines can also use this additional information to serve richer and more intuitive search results depending on the user's query.
Schema.org can be added to a website using mark-up formats like Microdata, RDFa or Json-ltd. In this tutorial, we will look at the basics of using Microdata to annotate HTML elements of a webpage.
2.) What is Microdata?
Microdata is a set of specifications which can be used to insert metadata within existing content on a webpage. In other words, Microdata can be used to annotate HTML elements with machine-readable tags.
It is generally used along with a vocabulary like Schema.org.
Confused? Don't worry about it. All you need to know for now is that Microdata and Schema.org can be used together to makeup different sections on webpages.
Microdata uses the following global attributes to establish relationships between various elements of a webpage:
- Itemscope: This attribute is used to define the scope of an item. Usually used within a div tag or HTML5 structural element eg: nav tags, article tags etc.
- Itemtype: This attribute is used along with itemscope and points to a URL on schema.org that describes the item that you want to create. (Refer image below)
- Itemprop: This attribute is used to define the properties of the created item.
- itemid: Can be used to provide a unique ID to an item.

Now let's see how you can mark-up a webpage using these attributes. Later in this article, we will also see how this markup can be added to your wordpress blog.
3.) Marking Up Webpages using Schema.org and Microdata
As mentioned earlier, Schema.org offers a set of schemas that can be used with Microdata to annotate webpages. Let's look at a few practical examples to understand this better.
a.) Example 1: Marking Up the Header of a Website
To annotate the header of a website, one can use Schema.org's WPHeader specification. To know more about this specification, visit this URL: https://schema.org/WPHeader. Used with Microdata, the HTML will look as follows:
<div itemscope itemtype="https://schema.org/WPHeader"> Header Elements </div>
We first define the scope of the item using itemscope. In this case, the scope of the item is restricted within the opening and closing div tags. We then use itemtype to point to the relevant URL on schema.org.
Once we have defined the scope and the item type, we can define properties of other elements within the scope using the itemprop tag if need be. Let's see how to use itemprop in example 2.
b.) Example 2: Marking Up Content Section of a Website
Similar to example 1, to annotate the content section of a website we can use Scheme.org's Article (https://schema.org/Article) or BlogPosting(https://schema.org/BlogPosting) specification. The marked-up code will look as follows:
<div itemscope itemtype="https://schema.org/BlogPosting">

    <h1> Article Heading</h1>
    <div>Author Name: Kevin</div>
    Published on: <time>21-10-2015</time>
    <div>This is the Article Content</div>

</div>
As you can see in the above HTML, the content of a webpage also contains additional elements that need to be annotated. These include the article heading, article image, date the article was published, article content and the author name. We can use Microdata's itemprop attribute to mark-up these elements.
It is important to note that the itemprop attribute needs to be used in relationship to the itemtype attribute that is being used. So if you are using itemtype="https://schema.org/BlogPosting", then you can only use properties that are specific to the BlogPosting item type.
The available properties can be viewed by vising the Schema.org's page for that particular itemtype which is in this case is: https://schema.org/BlogPosting. Refer image below:

The following are the available properties (for the BlogPosting itemtype) to annotate the elements in the content section:
Article heading: itemprop="headline"
Author Name: itemprop="author"
Published date: itemprop="datePublished"
Article content: itemprop="articleBody"
The following is how the marked-up HTML will look like:
<div itemscope itemtype="https://schema.org/BlogPosting">

    <h1 itemprop="headline"> Article Heading</h1>
    <div>Author Name: <span itemprop="author">Kevin</span></div>
    Published on: <time itemprop="datePublished">21-10- 2015</time>
    <div itemprop="articleBody">This is the Article Content</div>

</div>
As you would notice in the above HTML, we added span tags around the author name in order to add the schema. This can be done whenever the need arises. Doing this can help you add schema without disrupting your design. You can also use HTML5 elements or div tags to add the schema.
c.) Example 3:Using Embedded Scopes For More Detailed Markup
Microdata allows us to create a new item in relation to the itemprop attribute in order to access new properties to annotate the content with. This is known as an embedded scope or embedded item.
Let's say you wanted to markup a blog post and within that the author of the post. The following is an example HTML of how you would achieve this:
<div itemscope itemtype="BlogPosting">
  <div>
     Article by <a href="author-url.html"><span itemprop="author">Kevin</span></a>
     Author Bio: This is the author bio.
  </div>
</div>
The above code uses itemprop="author" to mark-up the author name. This is because, author is a property of the BlogPosting item type.
Now what if we also wanted to markup the author URL and the author bio? The BlogPosting item type does not give us the properties required to mark-up these additional elements. This is where an embedded item comes into play.
To mark-up these additional elements we can define a new itemtype in relation to the author property.
To see what itemtypes are available for usage, you can do either of the following two methods:
Method 1: Visit the Schema.org URL for the main item, which in this case is BlogPosting (http://schema.org/BlogPosting), on this page the item types that can be used as embedded items are listed in the Expected Type column as shown in the image below:
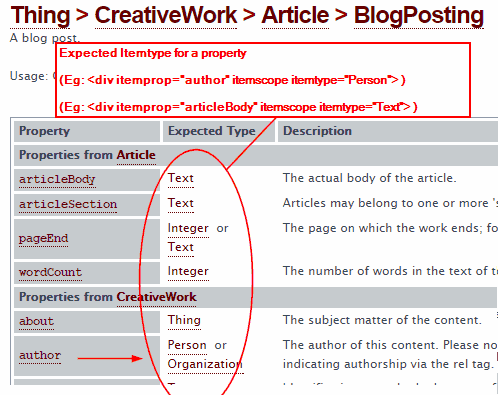
Method 2: Vist the Schema.org page for the property in question which in this case is https://schema.org/author. On this page, you will see a section which says "Values expected to be one of these types" as shown in the image below.

As shown in the image, the itemtypes available for the author property are Person and Organization. Since a author is a person, we will be using the Person item type. The properties of the Person item type are listed here: https://schema.org/Person.
Here is the marked-up code that uses the Person item type to mark-up the author elements:
<div itemscope itemtype="https://schema.org/BlogPosting">
  <div itemprop="author" itemscope itemtype="https://schema.org/Person">
   Author Name:
   <a href="author-url.html" itemprop="url"><span itemprop="name">Kevin</span></a>
  <p>Author Bio: <span itemprop="description">This is the author bio.</span></p>
  </div>
</div>
In the above code, we have added the itemprop="url" inside the ahref tag that contains the URL to the author page. We then wrapped the author name with span tags to include the iterprop="name" property.
In addition to marking up the author bio and URL, you can also add a whole lot of other markups like the author address, job title, email, brand and many more. To see the complete list of properties available check out this URL: https://schema.org/Person
This is all there is to know about using Schema.org and Microdata to markup a website. If you are still unclear, just go through these examples once again and you should be able to grasp the concept.
Now that this is clear, let's see how you can mark-up your wordpress blog using Schema.org.
4.) Marking Up Your WordPress Blog Using Schema.org and Micodata
The image below illustrates the basic tags that can be added to mark-up your blog.

a.) Body Section
We start off by adding the Blog itemtype (https://schema.org/Blog ) to the opening body tag. This will inform the search engines that our website is a blog.
You can easily add this to your wordpress blog by opening your theme's header.php page.
b.) Header Section
Next in line is the header section which can be annotated using the WPHeader (Web Page header) item.
You can add this within the html5 header tag or within a div or span tag. Again, to add this to your wordpress blog, open your header.php page and add it within the header tags:
<header id="masthead" itemscope itemtype="https://schema.org/WPHeader">Header Elements</header>
c.) Navigation
The SiteNavigationElement item (https://schema.org/SiteNavigationElement) can be used to mark any navigational elements in a blog. Most wordpress theme's include a html5 nav tag within the header section of the blog and this item can be defined within those tags as follows:
<nav id="site-navigation" role="navigation" itemscope itemtype="https://schema.org/SiteNavigationElement">
<a href="#">Link 1</a>
<a href="#">Link 2</a>
<a href="#">Link 3</a>
<a href="#">Link 4</a>
</nav>
To add this tag to your wordpress blog, open your theme's header.php page and add this item within the nav tags or a div tag that contains navigational links.
d.) Content Section
For content section we add the itemprop="blogPost", which is a property of the Blog item (https://schema.org/Blog ) that we defined within the body tags. In order to annotate other elements within the content section that include the article headline, author name, date published and article text, we need to embed another item or in other words, add a value for the blogPost property (refer example 3 on adding embedded items).
If you check the schema.org page for blogPost (https://schema.org/blogPost) you will notice BlogPosting under the 'values expected to be one of these'. So our embedded item needs to be BlogPosting and we can add this as follows:
<article itemprop="blogPost" itemscope itemtype="https://schema.org/BlogPosting"> Content </article>
The BlogPosting itemtype allows us to define various sections of our article namely, the heading, author name, date published and article content to name a few.
To get a list of all properties available for use under the BlogPosting item, check out this link: https://schema.org/BlogPosting
For the article/content section, here are the basic elements that need to be annotated:
- Article heading
- Date Published
- Article Text
- Author -> Author Name, URL and Description
Here's an example of the annotated HTML:
<body itemscope itemtype="https://schema.org/Blog">
<header>...</header>
	<article itemprop="blogPost" itemscope itemtype="http://schema.org/BlogPosting">
	<h1 itemprop="headline">Article Heading</h1>
	Published on: <time itemprop="datePublished">21-10-2015</time>
	<div itemprop="articleBody"> Article text </div>
	  <div itemprop="author" itemscope itemtype="https://schema.org/Person">
		Author name: <a href="#" itemprop="url"><span itemprop="name">Kevin</span></a>
		Author Bio: <span itemprop="description">Kevin is the author of this article.</span>
	  </div>
	</article>
</body>
As you can see, to markup the author, we have embedded a new item Person (https://schema.org/Person) as discussed in the example 3 earlier. The person item gives us all properties that we need to annotate the author name, URL and description.
To add this to your blog, open your theme's content.php or content-single.php (depending on your theme) and try to find the <article> tag or a div tag that wraps the content. In order to add the date published and author items, you will need to check your theme's functions.php to find and edit the function used to add these in your theme.
e.) Comments Section
We can use itemprop="comment" to annotate individual comments. The comment property belongs to the Blog item (https://schema.org/Blog). To annotate further elements within the comment which include the commenter name, Comment text and date the comment was published, we will need to embed a new item.
If we check the URL for the comment property (https://schema.org/comment), we see the Comment itemtype (https://schema.org/Comment) under the 'Values expected to be one of these types'. So that's the item we will be embedding as follows:
<div itemprop="comment" itemscope itemtype="Comment"> User Comments </div>
The itemtype Comment (https://schema.org/Comment) gives us the following properties:
Commenter name: itemprop="name"
Comment Text: itemprop="text"
Comment Date: itemprop="datePublished"
The annotated HTML should look as follows:
<body itemscope itemtype="Blog">
<header>...</header>
<article>...</article>
  <div itemprop="comment" itemscope itemtype="Comment">
     User Comments
     /* Comment 1 */
     <span itemprop="name">Kevin</span> said:
     <time itemprop="datePublished">21-10-2015</time>
     <span itemprop="text">This is the comment text.</span>

     /* Comment 2 */
     <span itemprop="name">Kate</span> said:
     <time itemprop="datePublished">25-05-2014</time>
     <span itemprop="text">This is the comment text.</span>
  </div>
<footer>...</footer>
</body>
You can add schema to your wordpress comments by editing your theme's comments.php page. If your theme uses the wp_list_comments() function, then you will need to create a new callback function in your theme's functions.php page and edit values there. Visit this URL to know how to do this: https://codex.wordpress.org/Function_Reference/wp_list_comments
f.) Footer Section
Finally the footer and sidebar can be anotated using the WPFooter and WPsidebar item types as follows:
<sidebar itemscope itemtype="WPSidebar"></sidebar>
<footer itemscope itemtype="WPFooter"></footer>
g.) Schema.org Meta Tags
In addition to adding these tags to annotate the HTML you might also want to add some meta tags within the head section of your site that define your overall website including your website name, website URL and person or brand that owns the website. Here's how the mark-up looks like:
<head itemscope itemtype="http://schema.org/WebSite" >
    <meta itemprop="name" content="Website Name"/>
    <meta itemprop="url" content="http://sitename.com"/>
    <meta itemprop="creator" content="Name of Person"/>
</head>
Hopefully this article clarified some core basics of using Schema.org and Microdata mark-up on your webpages. Using this information, you should be able to add any type of mark-up be it marking up your product listings or some specific article type like a review article. A few important links to schema.org items that can be used to trigger rich snippets in search results are as follows:
Product: https://schema.org/Product
Event: https://schema.org/Event
Review: https://schema.org/Review
Book: https://schema.org/Book
Recipe: https://schema.org/Recipe
Movie: https://schema.org/Movie
Organization: https://schema.org/Organization
Code: https://schema.org/Code
5.) Validating Your Schema.org and Microdata Markup
Once you have added the mark-up to your webpages, it is important to test the mark-ups to see if everything is working fine. The simplest way to do this is to use Google's Structured Data Testing Tool. Once you are on the tool, click on Fetch URL, enter the URL of the webpage you want to test and click on 'Fetch and Validate'. If everything is fine, you should be able to see your results in green in the right column. If there are errors, the tool will point them out for you.
Make sure to check, your homepage and a few different pages like your category page, contact page etc. to make sure all pages have valid mark-ups.
HI:) A very good article:) Love from sweden, and a lot of more articles in your blog:) Love from sweden
Not working .... validator shows error when I validate a pgae
Hi Ali, please email me at mukesh@orbitingweb.com with your website address or screenshot of the error and I will help you out.
You use itemtype in two styles:
1. https://schema.org/ (with 'https://schema.org', for example itemtype="http://schema.org/WebSite")
2. (without 'https://schema.org/', for example: itemtype="WPSidebar")
When I have used style 2, Google structured data validator informed me about errors.
This is great info! Thank you for such a comprehensive tutorial.
Spotted a typo :) In section 3. b) you wrote "itemprop=dataPublished" for blog entry but this is wrong. The correct attribute value should be "datePublished".
Thanks Matthew, corrected.
Hi I am unable to add product schema on my website please tell me what can I do?