Cloudinary is an 'Image CDN' that primarily allows you to store your images in the cloud and serves them via its CDN (Content Delivery Network). Because the images are served using a CDN, the delivery is much faster. This is because, a CDN has servers distrusted in various parts of the world and loads images from servers closest to the user.
In addition to this, Cloudinary also allows you to add a whole host of transformations to your images. This includes but is not limited to the following:
- Resizing, cropping, rotating images.
- Changing image format (both automatically and manually).
- Optimizing the images to reduce image size.
- Enhancing images to make them look professional.
- Adding a whole range of effects such as - Adjust brightness/contrast/color, sharpen, remove red eyes, blur faces, tint, cartoonify and many more.
- Add opacity and border.
- Remove image background.
- Add zoom in effects.
- Add watermark to images.
As mentioned, these are just some of the many transformations that Cloudinary allows you to do with your images. In addition to these, there are also a whole range of paid and free Add-ons available that you can use to further enhance your images.
Let's see how you can set up and use Cloudinary with your WordPress blog:
1.) Set-up your Cloudinary account
Simply go to Cloudinary.com and sign-up for a free account.
Once signed in, go to 'Settings > Account', scroll down and change your 'Cloudinary cloud name' to your site name (or any other preferred name) and click 'Save'.
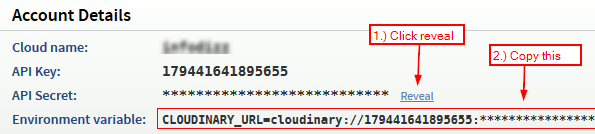
Go to your 'Dashboard' and under 'Account Details', click 'Reveal' so you can see your 'API Secret'. Now copy the text next to 'Environment Variable'.
You can use this API key (what you copied under 'Environment Variable') to connect your wordpress account to your Cloudinary account.
The next step is to add the Cloudinary wordpress plugin that will allow us to make this connection.
2.) Install and activate the Cloudinary wordpress plugin
Login to your wordpress dashboard, go to 'Plugins > New' and search using the keyword 'Cloudinary plugin'. Install and activate the Cloudinary plugin. (Make sure the author of the plugin is 'Cloudinary' before installing.)
Once activated, go to 'Cloudinary > Settings' and enter your API key (Environment Variable that you copied in 'step 1') and click 'Update Settings'.
You should now be connected to Cloudinary.
3.) Uploading existing images to Cloudinary
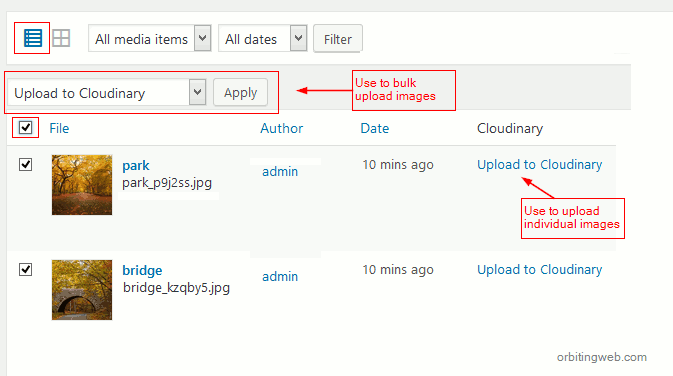
To upload your existing WordPress images to Cloudinary, login to your wordpress dashboard and go to 'Media > Library', make sure that 'list view' is on. If you want, you can click on screen options and set the number of items per page to 100.
Now you can upload individual images to Cloudinary by clicking the 'Upload to Cloudinary' link next to the image.
You can also bulk upload images by selecting all files, and selecting 'Upload to Cloudinary' from the 'Bulk Actions', drop down menu.
Once your images are uploaded, all image URLs will be changed automatically to Cloudinary URLs.
For example,
If your image URL was as follows:
<img src="https://sitename.com/wp-content/uploads/2017/07/my-pic.jpg">
It will be changed as follows:
<img src="http://res.cloudinary.com/sitename/image/upload/v1500609523/my-pic.jpg">
You can confirm this change by checking a few of your wordpress posts from your dashboard using the 'Text view' (Not the visual view).
4.) Inserting images into wordpress posts/pages
To insert an image from Cloudinary to your post, do the following:
While writing/editing your post, click on the 'Cloudinary Upload/Insert' button located next to the 'Add Media' button.
Now you can either upload a new image from your computer or use an existing image.
To use an existing image, simply, click on the image and then click on 'Insert into post' button.
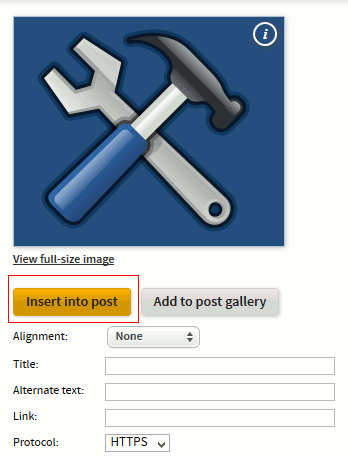
To upload a new image, click on 'select file' and upload the image; once uploaded, click on the 'uploaded image' to be taken to the image transformation page. Click on the 'Insert into Post' button to insert this image into your post.
If you want, you can also add transformations to the image and then click 'Insert into post'.
All your transformations are saved and can be accessed using the 'View derived images' button.
Transformations that you used in your wordpress posts will automatically be downloaded and saved in your 'Wordpress Media Library'.
WordPress Media Library: Loads images to and from your hosting server.
Cloudinary Media Library: Loads images to and from the cloud (Cloudinary server).
So if you do not want to use Cloudinary for some small images, you can simply insert them from the WordPress Media Library as usual.
For larger images, you can load them from Cloudinary.
5.) Add image transformations
As mentioned above, you can add transformations to any image uploaded to the Cloudinary Media Library.
You can access the media library directly from within your wordpress dashboard by going to 'Cloudinary > Media Library' or by going to Cloudinary.com and logging in.
Once you are in the Cloudinary Media Library, click an image that you want to add a transformation to. You can then add any transformation you want to the image.
Each transformation you make is auto-saved. You can check these auto-saves by clicking on the 'View Derived Images' button.
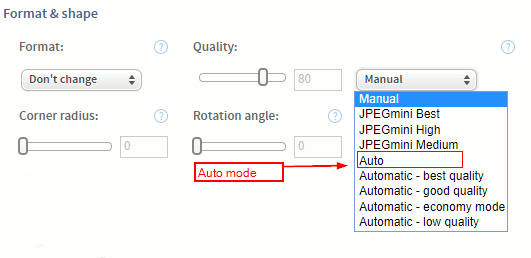
For example, let's say, you want to reduce the size of an image. You can do this by changing Manual to 'Automatic - Economy Mode' from under the 'Format & Shape' section.

This will add a new parameter (a_auto:eco) to the image URL as follows:
http://res.cloudinary.com/sitename/image/upload/v1500696916/buildings.jpg
http://res.cloudinary.com/sitename/image/upload/q_auto:eco/v1500696916/buildings.jpg
For every transformation you make, new parameters are added to the URL.
Click on 'Refresh Preview' button over the image Preview to save your transformation.
As mentioned earlier, you can view all your transformations for an image by clicking the 'View Derived Images' button.
If you use this transformation in your wordpress post, it will be downloaded to your WordPress Media Library.
6.) Cloudinary Add-Ons
Cloudinary has a range of free as well as paid add-ons that you can use to enhance your images.
You can access 'Add-ons', but logging into Cloudinary.com and clicking on 'Add Ons' from the sidebar. Select the 'add-on' you want, and click the 'Free' quota to activate the Add-on.
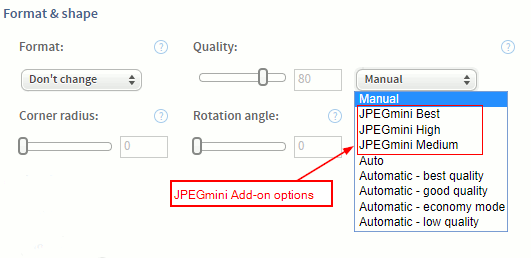
For example, let's say you want to activate the JPEGMini Add on. This add-on helps reduce the overall file size of your JPEG images while maintaining the quality.
It gives you 100 free image manipulations a month.
After activating the 'JPEGmini add-on' (by clicking the free plan), go back to your media library and click on an image that you want to use this Add-on with.
Under the 'format and space' section, you should be able to see three new options added - JPEGmini - Best, High and Medium. Select 'Medium' to get the highest compression and click 'Refresh Preview' or 'Insert image to post' if you want to insert the optimized image into a post.
The following are some of the Add-ons available:
- AWS Rekognition Celebrity Detection: Lets you automatically detect and add tags to images based on the recognized celebrities.
- OCR Text Detection and Extraction: Automatically detects text in images and applies effects to the text, for example, blur license plate numbers.
- Imagga Crop and Scale: Helps you smartly crop your images to include the main subject and crop the rest.
- URL2PNG: Helps you capture and embed screenshots of any public webpage.
- JPEGmini: Compresses and reduces the size of JEPG images while maintaining the quality.
- Advanced Facial Attributes Detection: Automatically reads facial attributes to detect gender, age, ethnicity and facial features. You can then add overlays to the image, for example, adding sunglasses to a face.
- Aspose Document Conversion: Automatically converts word/excel/powerpoint documents to PDF or other image format.
- Remove background: Automatically removes the background from your images and adds focus to the main subject of the image.
- Viesus Image Enhancement: Automatically enhances your images to make them look professional and visually appealing.
7.) Automatic image manipulations
Cloudinary has a cool feature that automatically serves the best format of your image based on the image content and the browser used to access the image.
For example, it will serve WebP images to all the Chrome browser users and JPEGxr to all Internet explorer users. These are new formats that significantly decrease the image load times.
This way, you know you are always serving the best format for any image.
To activate this feature, simply click on an image and select 'Auto' from the 'Quality' drop down menu.
Your image URL with 'Auto' feature enabled will look as follows:
http://res.cloudinary.com/sitename/image/upload/q_auto/v1500696916/buildings.jpg
You can then 'insert' the image into your posts.
8.) Uninstalling Cloudinary
If for any reason you decide to stop using Cloudinary, do not uninstall the Cloudinary plugin before migrating your images from Cloudinary.
Migrating your images back from Cloudinary will change all your image URLs back to wordpress URLs. In other words, your images will start loading from the WordPress Media Library as opposed to Cloudinary Media Library.
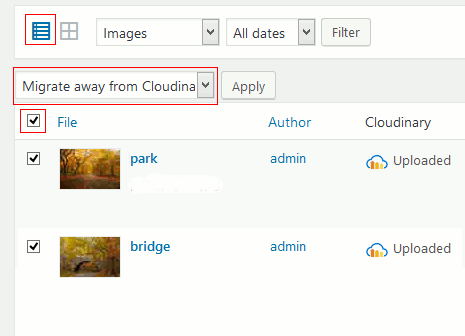
To migrate your images, go to 'Media > Add New', and select all images that you wish to migrate. (Make sure that list view is on).
It is suggested not to select more than 50 images at a time. Once selected, select the 'Migrate from Cloudinary' option from the 'Bulk Actions' drop down.
Once the images are migrated, you will be able to see the 'Upload to Cloudinary' link next to them. You can then migrate another set of 50 images. Another way is to migrate images month by month using the filter.
As the images are migrated, their Image URL is also changed back to your server.
Once the migration is complete, you can uninstall the plugin.
If you uninstall the Cloudinary plugin before migrating your images, you will need to manually change all image URLs from Cloudinary URLs to wordpress URLs. That can be super tedious of a task.
If you have any further queries on using Cloudinary, feel free to leave it in the comments below and I will be happy to answer them for you.
This is really helpful, I will try it, because its free anyway :D and easy to do reversal action.
I have recently migrated all my media to cloudinary, and the problem is that cloudinary send all my images non-secure, any suggestion please.
Thanks
Yassine, you might want to contact their support. It should be resolved with some minor change to the settings.
I thought that on uploading to cloudinary the images on ISP Space are still there.
It would be a great thing to reduce even backups this way. I got a photo page and backup via duplicator including wp-uploads will be very extensive. Yes i can exclude it on duplicator. But I think if on uploading to cloudinary it would be great if the original image will than be deleted - so wp-uploads folder gets smaller then.
Is there any option to activate an add-on for bulk image optimizations?
Thanks for this post. It was a life-saver. Cloudinary wasn't working out for me at all and I needed to delete it but there is NOTHING on their site or anywhere else that I could find about actually removing it. I managed to break my site before I found your page and figured it out.
Really glad the article helped you fix your site.
Hi thanks for your article! Have you noticed that after installing and then migrating "to" and then "away" from Cloudinary, site files on the host is doubled in its size, that means that Cloudinary duplicates media files on your site as well? Looking for solution to remove history and duplicated files from my site. If you have any please let me know.
hello Mukesh, what you do is truly extraordinary.
You can explain the step-by-step process to activate and use the Remove background add-on.
Thanks
After uploading the images onto cloudinary in WordPress, do I need to remove them from WordPress media library?
Are the images optimised for both desktop and mobile views?